Tuesday, August 31, 2010

S-Flow to Straight Flow Hotbits Muffler

My previous muffler setup was S-flow due to the ride was on auto mode. After the conversion to manual, Mr C had suggested that the back had to be cleared off. This is to gain some high end torque.

Coincidently, my friend, Vincent was looking for a straight flow end muffler as well. So, I just asked him to get me the same muffleras his :). We wanted a straight flow with a low sound resonance muffler. Our friend, James had been using this muffler for about 3years...and he strongly recommend this muffler coz it was very quiet-straight flow muffler. ;P.

And he ordered 1 for himself too, coz his existing muffler showed signs of old age. ;D. So, Vincent ordered a total of 3 mufflers from his friend from KL. He got bashed up by his fellow friend for getting so many mufflers at 1 time. Haha.

Later when the mufflers arrived, Vincent and I went to POI Exhaust to get it installed. I had changed my exhaust header at this same shop. Previous article was HERE.

Hotbits muffler - Quiet-straight flow...


Under the car...S-flow...


Hotbits in...custom tail pipe...need to redo it again soon.. :P


The welding spot...


Fixed a flange for easy and exchangeable in future...


Closer look...


Well, after the changed of this muffler, butt dyno tells me that not much difference. But after a few days driving it, my butt dyno gave another reading. Hehe. The response was better and the willingness of the RPM needle to climb up was much more faster. When going for top speed, it felt smoother. In sound wise, it was perfect. Very quiet when cruising on the highway and not disturbing others. Hehe. Great deal on this muffler. ;D

Saturday, August 21, 2010

Auto - Manual Conversion - Final

It's been a few weeks since I got my ride back. I guess it is time to give my point of view for this conversion. :P. Well, it is not a professional review, it is just a personal point of view of myself.

I'm impressed and very much satisfied by the workmanship and all the detailings that Mr C had put in. It was very clean and neat. If I didn't tell anyone about this conversion, I guess the person who was viewing it will think that this was an original EK3. ;)

All the wirings had been done up neatly. Sockets relocated according to EK3. Any missing brackets had been replaced. It wasn't the best engine bay but I'm still satisfied with the works. :)

We found out that the bottom of the engine was leaking when doing this conversion. After checking, it was the oil pan area that caused the leaking. So, a new gasket had been replaced. Then Mr C need to redo the wirings under the dashboard. I got scolded when he saw the bunch of messy wires under the dashboard. :)

The previous owner was the culprit. Hehe. So, Mr C had redo the wirings. To be able to do all the wirings, he will need to take out the air cond parts under the dashboard. So, I guess it is time to give my air cond a good service. :P

Well, enough for the long process. Let's view some of the end result photos. :D

Neat and clean...


Clutch oil container on it's place (just like original)...


Correct position of the pedals?...yes, very comfortable...


Gear lever with original EK9 shift boot...but with a replica EK9 gear knob...


Inside view after glove compartment opened...


No sign of any wires under the steering wheel...


Gear box internals before the casing been mounted back...


Another view...


Before cleans up...


After cleans up...


From the photos above, you can actually see that all the wirings below the dashboard had been tuck in and hidden. Very neat and I like that very much. Nice job on that. :)

What can you see from the before and after photos? Not much a different, but the obvious part was the inlet manifold area. That area no longer messy with all the cables and wires. The throttle cable had been reposition according to the original EK position. Changed the battery terminal connector to the snap on type. Much more convenient for battery thieves to steal my battery. Haha. :)

As for the performance wise, I must say that it is far more better than auto. The response was fast and great. No more lagging for the power to be delivered. ;P

I guess this is a very worthy upgrade. ;D

Sunday, July 11, 2010

Auto - Manual Conversion - Part 2

Here's part 2. Hehe. :)
Work still on going this weekend. There was still a little finishing job had to be done. As for now, everything was in place. I predicted that my ride will be out in this few days. Hehe. :P

Work progressing...


Very clean starter..


Gear lever and linkage in place...


Pedal set in order...but still very messy...


Gear mounting and etc all done..


I wonder if there is part 3 for this topic? Hehe. I don't think so. I will update the final outcome of this auto to manual conversion in the next post. Plus...I will try to explain what's the difference between driving an auto and a manual tranny (from an amature and noob driver point of view). Hehe.. ;P

Wednesday, July 7, 2010

Auto - Manual Conversion - Part 1

Well, after keeping quiet for awhile, it's time for new updates. Before this, I bought a B18cR 4.4fd LSD gearbox. After polished and serviced it, everything was kept away. Now, all the necessary parts had arrived and the show had begins. The conversion from auto to manual had started. :P

It takes a lot of patience and hardwork to get evrything nicely done. I gave this task to Mr. C. Hehe. ;)

Currently had started to take out the auto gearbox. Auto gearbox out, but manual not yet in. Why? Coz everything had to be cleaned before going in. Engine block, body firewall, steering rack area and lots more. I took this chance to get the whole engine bay cleaned up. Hehe. :)

For the clutch pad, due to budget constrain, I chose Honda original clutch pad. Mr C called it 'tiger skin'. From the clutch pad appearane, it does look like tiger skin (yellow with black stripes). :P

Auto gearbox is out...


Before...


After...


Can you notice the difference between before and after. Look closely, the engine block was cleaned. Lots of thick oil accumulated at that area. Mr C will have a check later. :)

Then I notice that there was minor leaking at the oil pan area. I think it's time to change the gasket of the oil pan. More $$$ needed. I'm way out of budget. :(
Anyone would like to sponsor me? Haha ;P

Well..more updates in a few more days...

Sunday, May 2, 2010

Dato Sagor Circuit, Kg Gajah - Outing with Swifters

Yesterday joined Swift Club Malaysia members convoy to Dato Sagor Circuit at Kg. Gajah, Perak. They joined a mini race organized by Cari.com (if I'm not wrong). There were 8 Swifts, 1 SX4 and 1 Mini Cooper. Oops..forgot to count me in, Civic. Hehe. :P

We started the journey early in the morning. Reached the circuit at 9am. After registration, drivers briefing and souveniors giving, they all headed into the circuit for a free practice time slot. Very challenging course. :)

I didn't join in the fun coz my ride had some problem previously. Need to fixed it before put it in the track. ;)

Convoy on the way to Kg. Gajah...


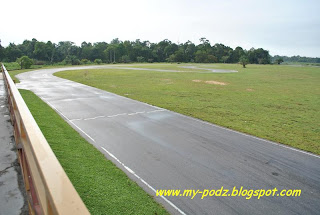
A part of the track...


A fast Satria...


Another fast car...


D2 sponsored fast Satria...


Another view...


Marshall of convoy for the day in action...hehe


Driver from Cameron Highland...


Cute Swift (cannot see those cute stickers)...

Monday, April 26, 2010

Canon EF 50mm f/1.8 II

Went to Poon's Photo on Saturday and got this lens for my new toy. This is the cheapest lens from Canon. It's a prime lens best suits for potrait photos. Will upload some photos in my photography blog with this lens soon after I got the chance to play with it. :)


No more budget for next month. :(